
Introduction
Creating stimuli is an important part of programming an experiment. Most experiments in cognitive psychology use visual stimuli. Stimuli are often very simple: Triangles, rectangle, circles, or single letters. Of course, they can be more complex, such as photographs, but in many papers, they are very simple line drawings, and you need software that can create such drawings easy and perfectly.
Inkscape is the main focus of this lesson, because it is ideal for simple sharp line drawings. Inkscape is used by professional designers, which proves its quality. And further, it is a freely available program that runs on all operating systems. Some other tools will be mentioned as well.
There are alternatives to Inkscape for creating your stimuli. Stimuli are just bitmaps, and any software that can create bitmaps can be used. Note, though, that many drawing programmes do not create the nice and clean drawings you can easily make with Inkscape.
If you cannot install a drawing program to your computer (e.g., in the University or at School), you can use some in-browser websites for drawing stimuli. Here are some links:
Alternatively, you can even get (some of) your bitmap stimuli from the Internet; for example, you can use Google images to search for bitmaps. If you use Google images for getting stimuli, make sure you resize them appropriately. You can use various programs for resizing stimuli, as explained further below.
| You can download an SVG file with a useful stimulus set to start with from the PsyToolkit website. |
Using Inkscape
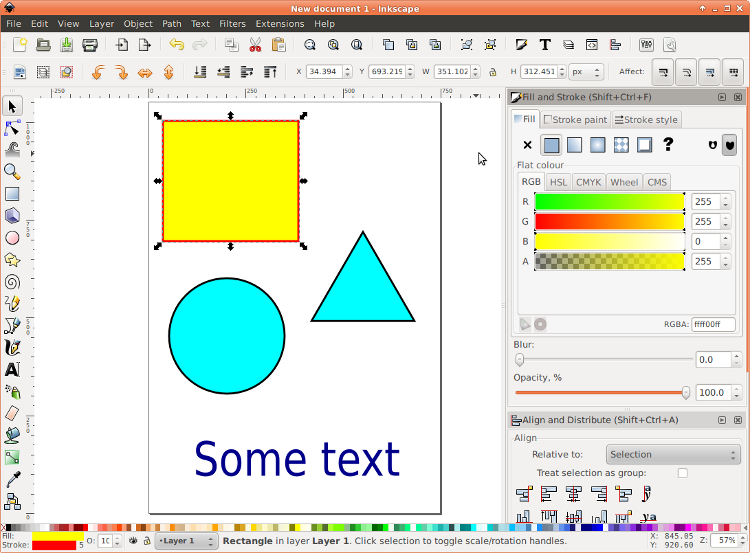
When you start Inkscape, you see a typical graphical user interface. You have a menubar and various toolbars. You see a page which is the canvas on which you can "draw". Below you see a screenshot. I have drawn a few objects, a yellow rectangle, a blue circle and a triangle and a blue text.
| Tooltips. If you move the mouse over the symbols of the toolbars, you will see a tooltip with some information. You will also see the keyboard shortcut for the same function. Once you are familiar with Inkscape, you can select functions by just pressing a key, which is typically faster than using the mouse. |
Definition of object
All things you can draw are objects. In the screenshot above, the are four objects (a rectangle, a circle, a triangle, and a text). Each object has a number of properties, such as a fill color, and a border (i.e., stroke) color. You can change the features interactively.
File format of Inkscape and stimuli files
Inkscape uses the SVG file format. PsyToolkit, however, does not use SVG! So how does this work then? Inkscape is ideal for drawing, but once you have used Inkscape to design your stimuli, you need to export your stimuli as bitmap files (do not confuse this with BMP, which is Window’s own bitmap format).
You can select your stimuli of your drawing and then tell Inkscape to save the selected part of the drawing as a bitmap. You can also specify the exact size of the bitmap in pixels. Below, this process with be illustrated with detailed examples.
| Background information: Definition of bitmap A bitmap is an image. An example of a bitmap is a digital photo. Bitmaps can be stored on the harddrive of a computer in different file formats, such as JPEG, PNG, and BMP. PsyToolkit uses bitmaps extensively and can work with all common bitmap formats. Inkscape exports bitmaps in the PNG format by default. |
Visual stimuli in PsyToolkit
In PsyToolkit, visual stimuli are either bitmaps, rectangles, or words. Rectangles are nice, but typically, you want more elaborate stimuli, and that is where Inkscape plays a role. Inkscape creates the stimuli that PsyToolkit can present.
Background
There are a number of reasons for the preferred use of bitmaps in PsyToolkit. For one, bitmaps will look the same on any computer, whereas stimuli that are only described by the software are potentially rendered differently on different computers. Also, rendering bitmaps is computationally simplest and fastest, which matters because PsyToolkit aims to be fast.
| Stimulus size. The default screen size in PsyToolkit is 800x600 pixels. This can be changed in the options. The default background color is black. This means that your bitmap stimuli should be smaller than 800x600 (unless you use a different resolution). |
Example: A green rectangle
Stimuli in experiments are often very simple. A rectangle is a common stimulus.
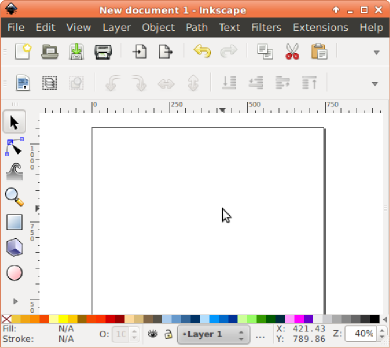
Step 1: Start Inkscape.
You should see something like what you see in the image below. The orange window border is specific to my system and this might look differently on your computer, depending on what operating system you use.
For this lesson, I have made the Inkscape window as small as possible. This is just to make the images fit within the browser window. When you start it on your own computer, you will see much more information on screen. Especially, there are more tools than you see here.
Note: You see many symbols that all reflect Inkscape functions. At the center, you see the area where you can "draw" objects. This area is called the canvas. You see the shape of the page, just like you might do in a text processor. This layout is similar to other software. The best way is just to "play around" a bit to get a bit of a feel for the program.
Step 2: Select the rectangle tool
The rectangle tool is indicated by the red arrow below. You can select the rectangle tool in different ways. You can click the rectangle in the toolbar on the left. Or you can type the key "r" or alternatively "F4".
| Default settings in Inkscape. You can set in Inkscape what the default colors are. In the current example, the rectangle was by default yellow. On your system, the default settings may be different. Once you are familiar with Inkscape, make sure you set the settings as you like them. From the menubar, choose "File", "Inkscape preferences", or type shift+control+p. |
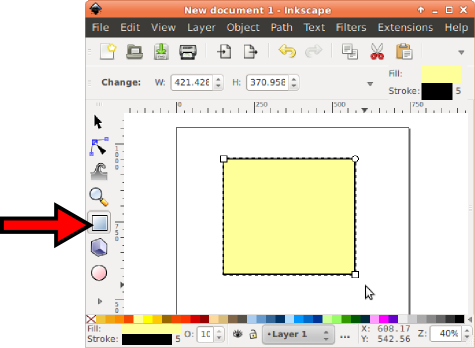
Step 3: Now you need to make the rectangle green.
You can do this in different ways. First of all, make sure the rectangle is selected. You need to click it, but before you click it, make sure you have selected the selection tool. You can do this by clicking the "arrow" in the toolbox on the left, or by typing the key "F1".
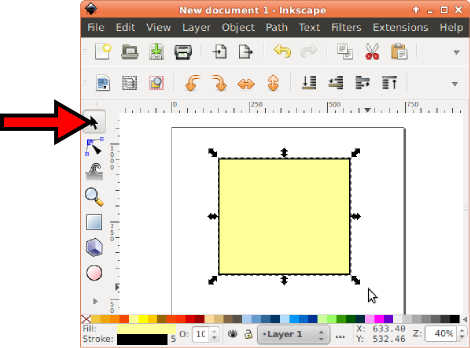
Step 3: Select color
At the bottom of the screen, you see a palette of different colors. Select green. You will now see that the rectangle is filled green.
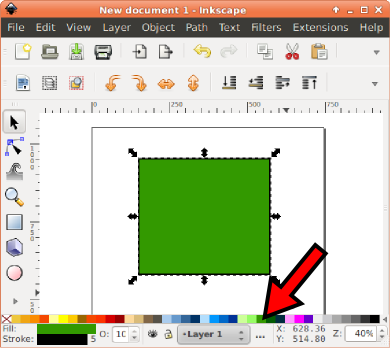
Step 4: Change stroke
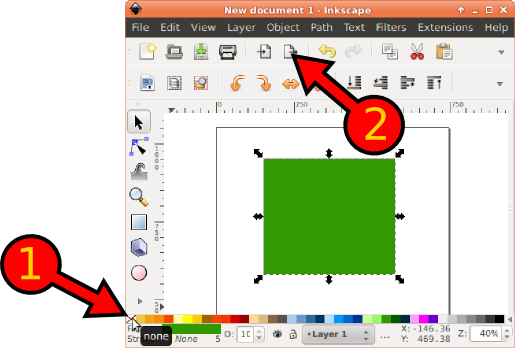
You likely will see that the rectangle still has a thin black border. This is called the stroke. You can either remove the stroke or make it green as well. To make it green, click a color from the palette, but while doing so hold the shift key. Alternatively, you can hold the shift key and click the little red X on the palette, which will remove the stroke color altogether.
Explanation of numbers in image below[] . Click the red X while holding the shift button. Make sure you do this while the green rectangle is selected (which you have if you see the black arrows around the object). .Click this symbol to export the selection as PNG bitmap.
Step 5: Resize
You can resize the rectangle a bit to suit your needs. Just use the handles of the object. If you do not see handles, select the arrow selection tool (or type F1) and click the rectangle. Resize as you like.
Step 6: Export
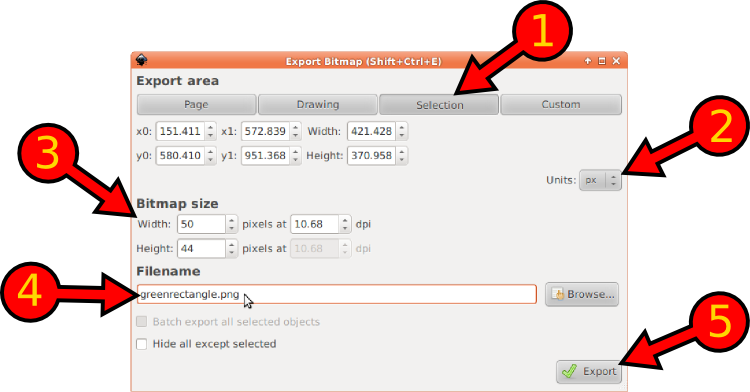
From the menu, select the export option (menubar: File, Export Bitmap). You can also type shift+control+e to do this. Set the width and height. Or just set the width, and type "enter", and you will see that the height will be changed to keep the same aspect ratio. Select a filename and save it somewhere. Later, PsyToolkit can use this file for the experiment.
Explanation of numbers in image below: . First, make sure you export the selected object. . Make sure you select px (pixels) as the unit to work with. . Set the appropriate bitmap size. Inkscape will remember the values. Also, if you just want to change width and height, you only need to change width or height, and then press enter. Inkscape will appropriately adjust the value you did not change to keep the aspect ratio. . Select a filename. Make sure you have selected the appropriate folder/directory. . When everything is set, click "export" to save the selection as bitmap.
Step 7: Save
From the menubar, select "File", "save" and save the file. This is different from exporting as bitmap. This time, you save the whole page, not just the green rectangle. Next time, when you want to work on your stimuli, for example to make a change to the color or the size, you would re-open this file, make some changes, and again save the stimulus using the export bitmap function.
Summary: You have created a SVG file containing a green rectangle. You have selected the green rectangle and exported it as a bitmap. Altogether, you have two files of two different formats (one is SVG and one is PNG).
| The rectangle is the simplest stimulus PsyToolkit knows. There is an alternative way of creating a rectangle without bitmaps, but that will not be discussed in this lesson. |
Example: A short text message on a black background
Often, you want to explain something to a participant, or you want to get their attention, or give an instruction, such as "switch of your phone". In this example, we are going to make a simple text message asking to switch of the phone and to press the space bar to continue.
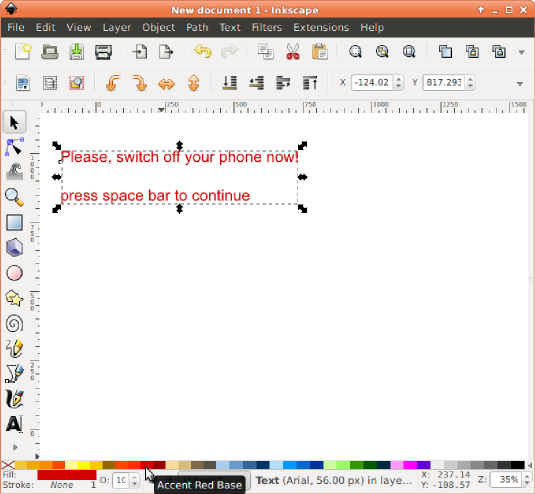
Step 1: Write the text
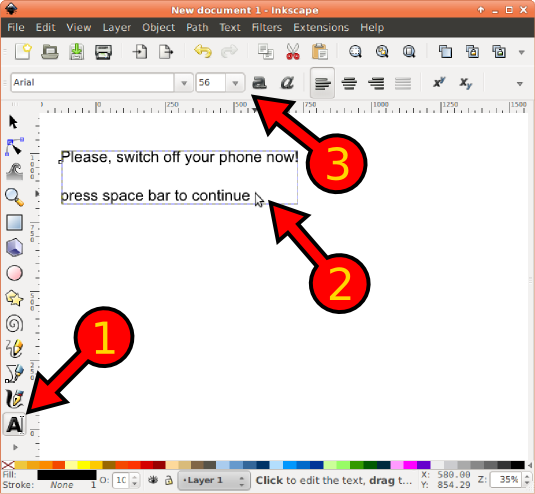
You first select the text tool [1], then you click the canvas and start writing [2], and further, you can change the font type, size, and properties [3].
Step 2: Change the color of the text
You click the arrow symbol (or press the F1 key) and then click the text. It will be selected, as you see in the example below. Then choose a color from the palette. Because we are going to have a black background, you should choose a light color. If you choose white, you will not be able to see the text, though (but see the tip below on how to deal with that).
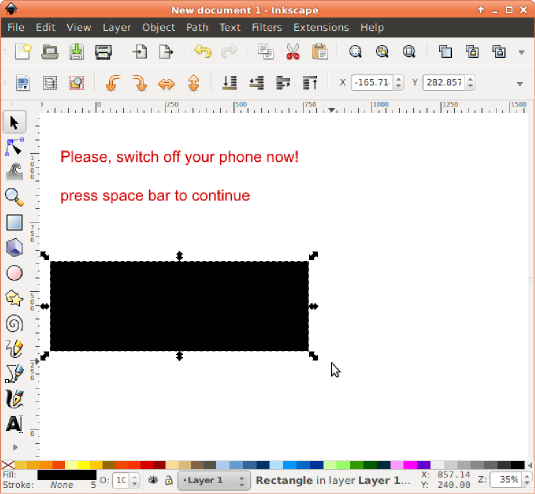
Step 3: Create a black background
Click the rectangle tool (or press "r") and draw a rectangle. Make it black (you should know how to to do this by now).
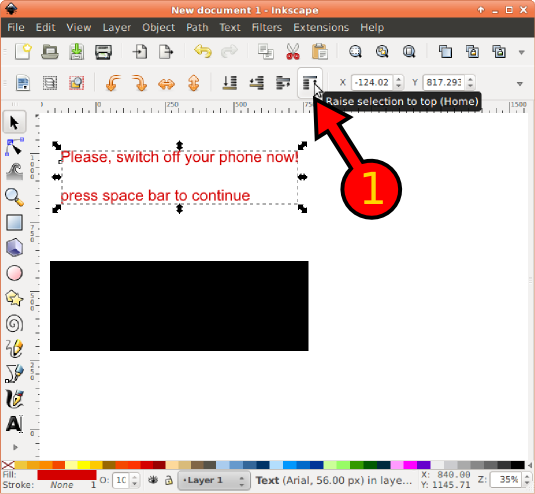
Step 4: Bring the text to foreground
Now click the selection tool (the arrow, or press the F1 key). Click on the text such that it is selected. Now click the "raise to top" button [1], or simply type the home key. This makes sure that the text is in front of the black background (see section on object order below for more explanation).
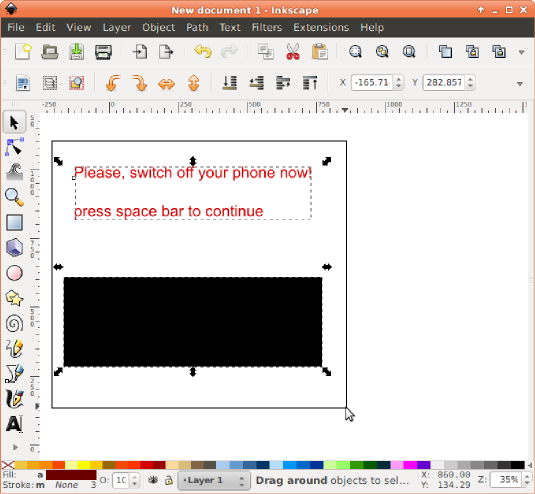
Step 5: Select all objects
Now select the selection tool (or press F1) and select all objects. There are only two objects. Just bring the mouse cursor to a position of the top left of the canvas, hold the mouse button, and draw an box around all objects and release the mouse button. Now all object are selected. Alternatively, you can choose "select all objects" from the menubar (File, Edit, Select All, or just press control+a).
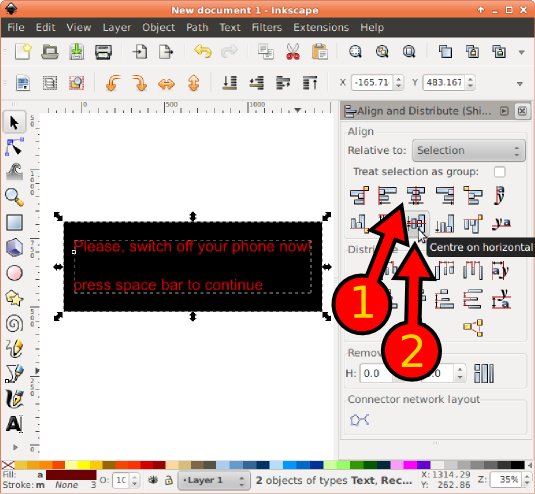
Step 6: Align the background and the text
Now we are going to align the selected objects. First, press shift+control+a to activate the alignment dialog (see example below on the right). Click the center horizontally [1] and the center vertically [2] buttons and see what happens.
Now your stimulus is ready. Export this as a bitmap, and make sure it is not bigger than 800x600. If it is bigger, it will not fit on screen! Do not forget to save the file as well, just in case you want to change your stimulus later. Again, you will have at least two files. One is the SVG file and one is the bitmap file of the stimulus only.
Summary: In this example, you have learned how to write a text and put it on a background.
| Setting background automatically to black (or any other color): Instead of creating a separate black background for each object, you can also set the canvas background to black (this will be demonstrated in example 4. Select from the menubar File, Document preferences (or press shift+control+d). You will get a small dialog window. At the top, it says general. Click on "Background" and select the color black. You can do this in different ways. If you use the RGB methods, just put the R, G, B sliders to the left, and set the A slider to the right (this is the opacity, you want full opacity). When you now export objects, the background will be black. |
Example: A triangle
So far, we have only created a rectangle and a text string. But with Inkscape, there are many other shapes you can create. The basic ones are on the vertical toolbar. The circle is so easy to understand that I will not further explain it here. A triangle is slightly more difficult. In this lesson, we are going to create a red triangle which points upwards. Further, this example is used to show how to resize and rotate an object, as well as to show how to make rounded corners.
Step 1: Draw a triangle
Select the "stars and polygons tool" [1] (or press the key *) and draw a triangle. Make sure, you choose the "regular polygon" [2] with three corners [3]. After you have clicked the "stars and polygons" tool button, move the mouse to the canvas. You will see that the mouse cursor looks like a little star. Click and hold the left mouse button and move the mouse and you will now see a triangle. The triangle has one "handle" [4]. You can use this handle to change the size and orientation of the triangle.
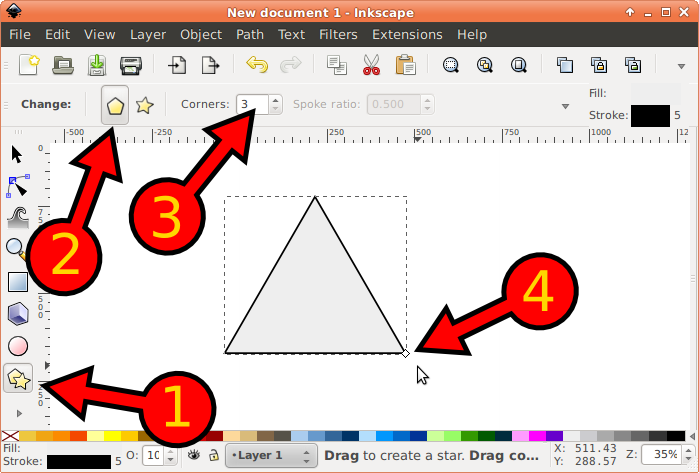
| How to create a triangle: Hold the control key down while you draw the triangle to keep the bottom side parallel to the screen (as in the image above). |
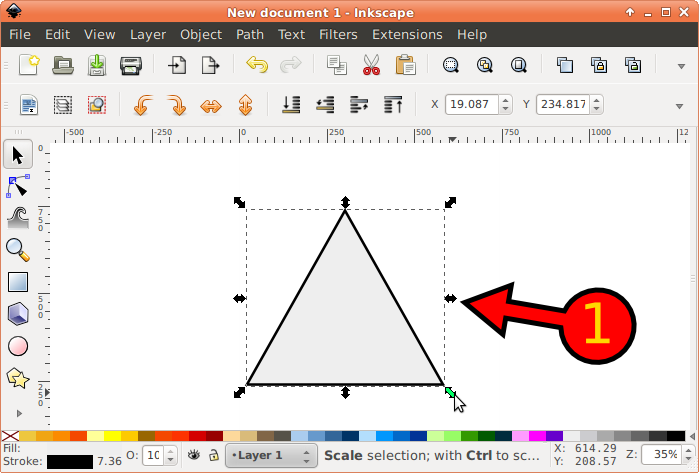
Step 2: Resize the triangle
There are different ways to resize the triangle. One way is to keep the polygon tool selected and drag the one handle of the triangle tool. Alternatively, you can press F1 (or click the arrow tool, that is, the selection tool). You can now drag one of the 8 black arrows [1] (see below).
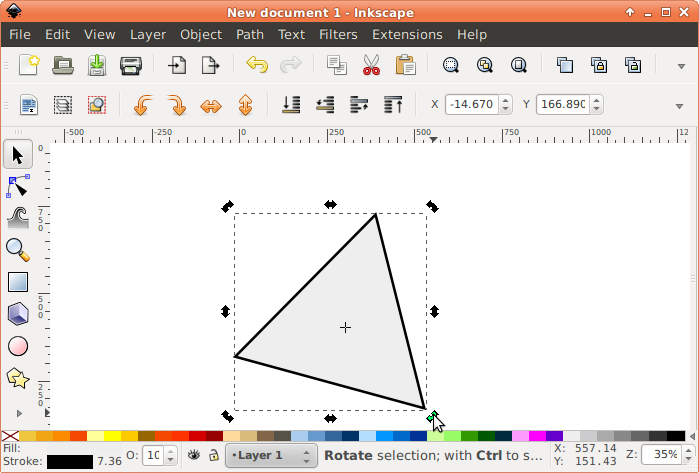
Step 3: Rotate the triangle
You can press F1 and resize or rotate. Press F1 (or select the selection tool) and click the triangle. Click once more and notice that the 8 black arrows around the triangle look differently! The type of arrows determines whether you can resize or rotate. Below, the black arrows are in rotate and skew mode.
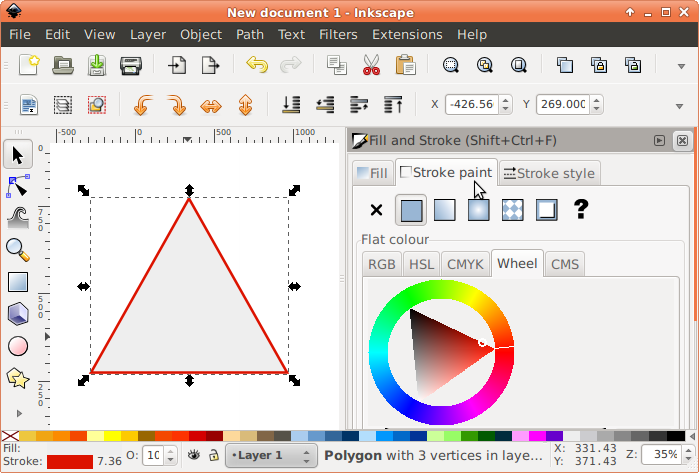
Step 4: Change the stroke color using the fill and stroke dialog
Press shift+control+f (or select the fill and stroke button from the horizontal toolbar, or go to the menu bar, select "Object", "Fill and Stroke"). In the fill and stroke dialog, click "Stroke paint" and "Wheel" and choose a color. Below, you see that I choose red.
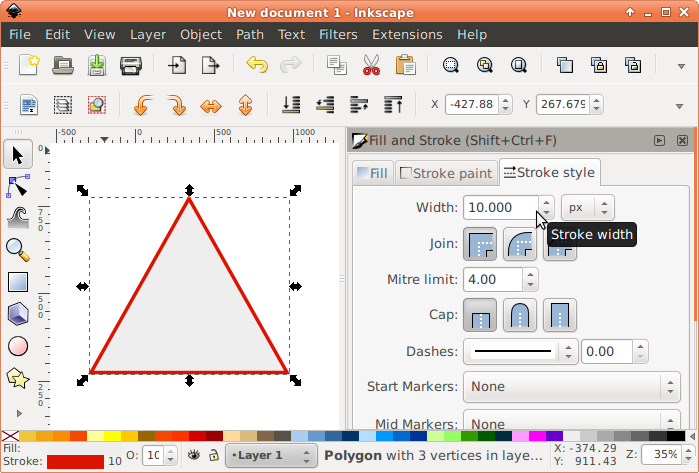
Step 5: Change the stroke width using the fill and stroke dialog
In the fill and stroke dialog, now click "Stroke style", and set the width to 10 and the unit to "px" (which it is by default). When done, click the close button of the fill and stroke dialog.
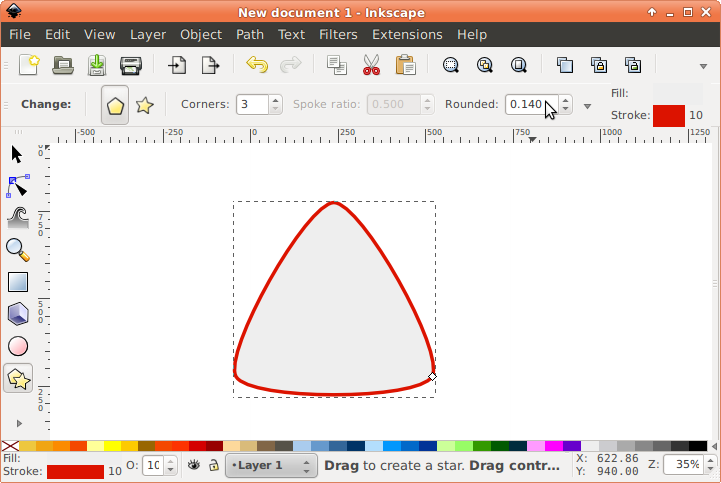
Step 6: Make round corners
Select the triangle (press F1 and click the triangle). Now press "*" or select the "polygon and stars" tool of the toolbar. Now change "Rounded" from 0 to 0.140.
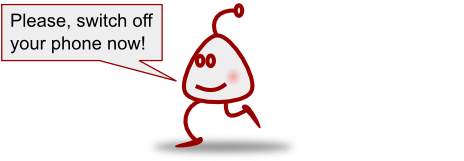
Summary: With Inkscape, it is easy to draw and modify shapes. With a few lines more, you already can have a little figure that can make your experiment a little bit more attractive to participants!
Example: A fixation plus sign
In this final example, we are going to create a fixation cross. In this case, we are going to create a white fixation cross on a black background. We will now use the canvas background color trick mentioned earlier.
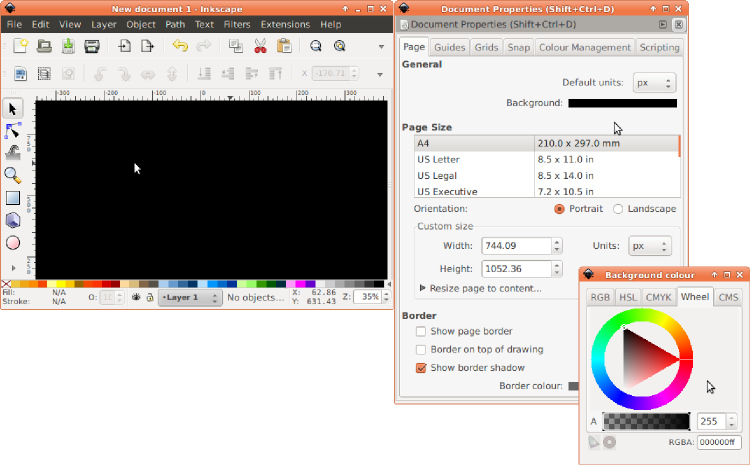
Step 1: Change the background color of the canvas to black
Press shift+control+d to change the document properties. Change the background color to black. Make sure you set the opacity to the maximum (in the image below, the opacity, or A, is set to the maximum value 255). The image below shows how to select the background color.
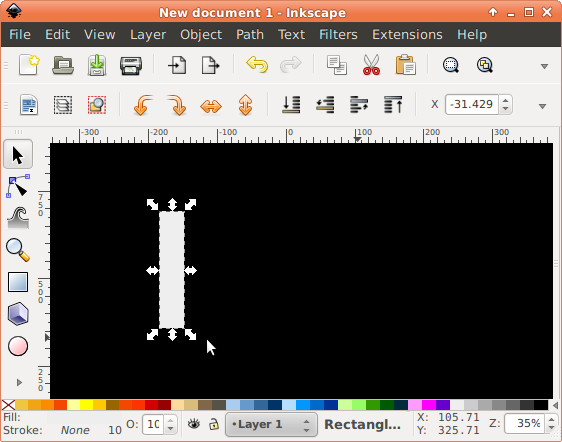
Step 2: Draw a rectangle
Draw a rectangle as shown below. Select the color white from the palette. Notice that Inkscape adjusts the arrows of the object (they are now white, and thus visible on the black canvas).
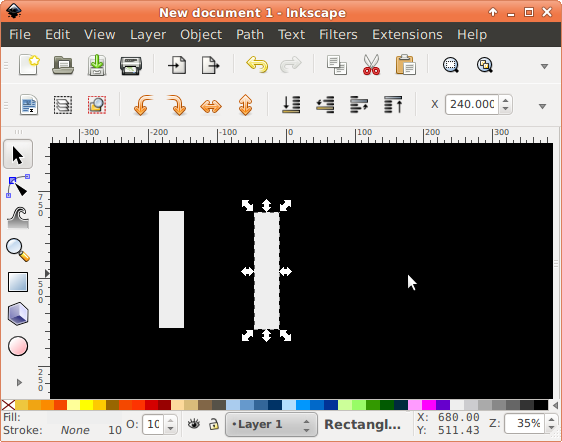
Step 3: Duplicate the rectangle
Select the rectangle and press control+d. This duplicates the object. Although you just see one object, there are actually two, but they are perfectly aligned on top of each other. Just click the only rectangle you seen and move it to the right. You will now see two rectangles.
| Inkscape object duplication: There are different ways to duplicate and copy objects. The duplicate function is handy. You can use it by pressing control+d, or by selecting from the menubar "edit","duplicate". Instead, you can also copy and paste (control+c and control+v). And finally, you can select an object, and hold the mouse down and move it and whenever you press the space bar, a copy will be made (try!). |
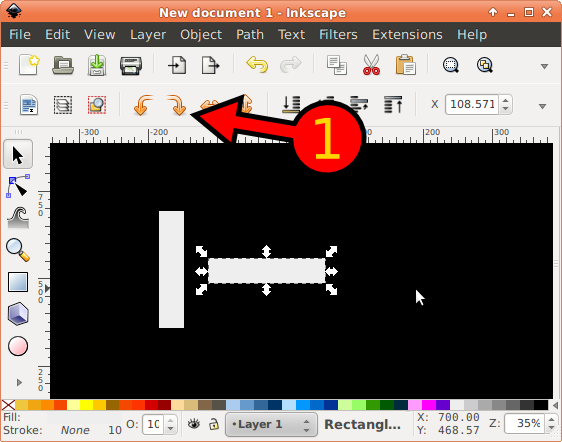
Step 4: Rotate the the duplicated rectangle
Select the right rectangle and press F1 (or click the arrow in the toolbar). Now click the rotate-clockwise [1] symbol and notice that your rectangle is rotated 90 degrees.
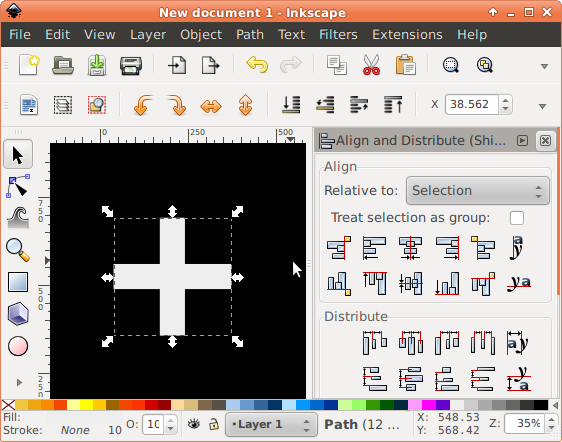
Step 5: Align the two rectangles
Now activate the align and distribute dialog (menubar: Object, Align and distribute; or press shift+control+a). Select both rectangles (for example, by pressing control+a or by dragging a box around them). Now center the two object vertically and horizontally (as you have done before).

Step 6: Combine them into one shape
In fact, you could stop now and export the objects. But you can also go one step further. You can combine the two objects into one by "unifying" them. From the menubar select Path, Union. This is handy, because Inkscape now treats this as one object. If you want to color it, you just give it one color (instead of having to color two objects).
| Inkscape has a great number of ways of combining basic shapes. You can not only combine, but you can also, for example, subtract. |
Step 7: Select and export
Three important concepts in Inkscape
Now that you have seen a few examples of how to make simple stimuli, it is time to know a bit more about important things of Inkscape use. Below, read about:
-
object order
-
fill and stroke
-
color
Object order in Inkscape
Objects can cover each other. If one object is covered by another object, you can "raise" it to the foreground. Select an object and press the "home" key to raise it to the foreground. Press then "end" key to do the opposite, to bring it to the bottom of the object stack.
Fill and stroke in Inkscape
Each object in Inkscape has multiple properties. Fill and stroke are two important properties. Fill color is the main color, and stroke color is the color of the border around it. If one of these is not set, it will just be invisible. If you want to draw a rectangle, you might not want a filling. If you click shift+control+f (which also has a symbol on the horizontal toolbar underneath the menubar), you get a dialog window in which you can set the fill and stroke properties.
Color in Inkscape
Color in Inkscape is easy to select. You can just select a color from the palette at the bottom of the screen. But there is more to it. Each color has four constituents:
-
Red: This is the amount of redness of an object
-
Green: This is the amount of greenness of an object
-
Blue: This is the amount of blueness of an object
-
Alpha (opacity): This is the level of transparency.
Each of these constituents is important. If you set Alpha to zero, the object will be invisible. Typically, you should set Alpha to its maximum value. If you want white, set all values to the maximum. If you want to know more about the so-called RGBA color model, check this: RGBA color space.
In Inkscape, you can very easily set these values. There are multiple ways to do this. For example, Inkscape lists RGB, HSL, CMYK, Wheel, and CMS models. They are just different ways to set colors. Which one you want to use depends on you. The "Wheel" method is very intuitive, just play around with it. Click anywhere on the color triangle and see what happens.
Changing the size of bitmaps
The standard size of the screen (resolution) is 800x600 pixels. Thus, if you want a small bitmap at screen center, it should be around 50x50 pixels. Or if you want a picture, you might choose a picture of 500x500.
You need to make sure that bitmaps are not too big. For example, a 10 megapixel image from your digital camera might be 3648x2736 pixels, which is far too big for PsyToolkit’s use. In that case, you need to resize it. There are various tools available, and even your photo software is likely able to rescale images. You can also try Gimp or imagemagick.
-
Step 1: Open the bitmap. Either type control+o or select from the menu bar "file", "open".
-
Step 2: Select from the menu bar "image", "Scale Image". Enter the new width or height, and type "enter". You will see that Gimp automatically adjusts the width/height to keep the appropriate aspect ratio. Once you are happy with the new size, click the button "scale", and your image will be rescaled. You can type control+z to undo.
-
Step 3: Now save the image. I recommend to keep the original size, and use "save as".
Or click here for an online Gimp resizing tutorial.
| Gimp might seem more than what is needed for just resizing images. Gimp is similar in functionality to the well known Photoshop. If you want to do more complex photo editing, it is good to have around anyway. Check out this list of Gimp tutorials. |
| You can make stimuli using your digital camera. Just make sure to resize them using Gimp or other resizing software. Photos are typically stored in JPEG format. PsyToolkit can use JPG format. You can also process photos even in Inkscape. |
Further reading
There is a lot more to learn about Inkscape. The best is to read a tutorial and just explore the program. For use with PsyToolkit, you do not need to be a master in Inkscape, though.